RPI camera → website → Chromecast → TV: (2) Streaming the video to TV

Why am I doing this?
As an unemployed engineer, I need to find interesting things to fill my leisure time. I found there is a thing I can do to make my life more convenient to see the toys under my couch without in the crowing position of bending my knee and waist to find the toys which are "eaten by the couch," my kids said.
Maybe I can use a camera on RPI to see the area under the couch and project the streaming video onto the TV by Chromecast. That is my initial thought.
Devices
- An RPI4
- A V2 camera
- My computer that I can run a server on.
- A Chromecast and TV
Goal
- Streaming the video to TV
From the previous post, I can stream camera data from RPI to my computer; this time, I need to project the camera data to my TV.
There are many ways to send the video to TV. My initial thoughts are that if I can write a website to show videos, I can project the webpage using the browser's built-in button, and all the works I did are surrounded by this idea. However, afterward, I found some methods that seem more directly to achieve this goal without the website in the middle [ mpd2chromecast
 ]. It may be a better choice, but I did not use it anyway.
- Streaming the video to TV
]. It may be a better choice, but I did not use it anyway.RTMP
Since we have an RTMP server where the RPI keeps sending video through the RTMP protocol, we need to find a way to render this video from the website, like the block diagram I drew below. I found that video.js can render the video directly in the <video> tag.

After surveying the internet [Link], the minimum frontend code should look like the HTML below.<!DOCTYPE html>
<html lang="en">
<head>
<meta charset="UTF-8">
<title>Live Streaming</title>
<link href="<https://vjs.zencdn.net/8.5.2/video-js.min.css>" rel="stylesheet">
<script src="<https://vjs.zencdn.net/8.5.2/video.min.js>"></script>
</head>
<body>
<video id="player" class="video-js vjs-default-skin" height="360" width="640" controls preload="none">
<source src="http://$RTMP_SERVER_IP:$RTMP_SERVER_PORT/rpicamera.m3u8" type="application/x-mpegURL" />
</video>
<script>
var player = videojs('#player');
</script>
</body>
</html>
The video source did not come from RTMP directly. Instead, the input should be converted to m3u8 sent from http. Fortunately, the previous docker container provides the service by default, but first, let me measure the latency for m3u8 through HTTP before connecting it to the video.js.
(The latency was around 7s, so I went through some settings of the RTMP server and, in the end, I shrank the gap to 4s.) [post1] [post2]
The final config of the RTMP server is like this:
rtmp {
server {
listen 1935;
chunk_size 4096; # default 4096
buflen 500ms; # add to reduce the latency
notify_method get; # add to reduce the latency
publish_time_fix off; # add to reduce the latency
application live {
live on;
interleave on;
record off; # add to reduce the latency
wait_key on; # add to reduce the latency
# access
# allow play 127.0.0.1;
# deny play all;
# hls
hls on;
hls_path /tmp/hls;
# hls_playlist_length 30s;
hls_fragment 1s; # add to reduce the latency
}
}
}
(7s latency)

(4s latency)
Then, let’s render the video on the website.
- My plan was open an HTML file directly, so I needed to open a browser by using below command to avoid the CORS error (since there was no origin source.)

open -n -a /Applications/Google\\ Chrome.app/Contents/MacOS/Google\\ Chrome --args --user-data-dir="/tmp/chrome_dev_test" --disable-web-security
And it worked, video.js showed the video on the website.

The latency is around 8 sec, so I hoped the UDP method can perform better.
Since we have an RTMP server where the RPI keeps sending video through the RTMP protocol, we need to find a way to render this video from the website, like the block diagram I drew below. I found that video.js can render the video directly in the <video> tag.
<!DOCTYPE html>
<html lang="en">
<head>
    <meta charset="UTF-8">
    <title>Live Streaming</title>
    <link href="<https://vjs.zencdn.net/8.5.2/video-js.min.css>" rel="stylesheet">
    <script src="<https://vjs.zencdn.net/8.5.2/video.min.js>"></script>
</head>
<body>
<video id="player" class="video-js vjs-default-skin" height="360" width="640" controls preload="none">
    <source src="http://$RTMP_SERVER_IP:$RTMP_SERVER_PORT/rpicamera.m3u8" type="application/x-mpegURL" />
</video>
<script>
    var player = videojs('#player');
</script>
</body>
</html>
The video source did not come from RTMP directly. Instead, the input should be converted to m3u8 sent from http. Fortunately, the previous docker container provides the service by default, but first, let me measure the latency for m3u8 through HTTP before connecting it to the video.js.
(The latency was around 7s, so I went through some settings of the RTMP server and, in the end, I shrank the gap to 4s.) [post1] [post2]
The final config of the RTMP server is like this:
rtmp {
    server {
        listen 1935;
        chunk_size 4096; # default 4096
        buflen 500ms; # add to reduce the latency
        notify_method get; # add to reduce the latency
        publish_time_fix off; # add to reduce the latency

        application live {
            live           on;
            interleave     on;
            record off; # add to reduce the latency
            wait_key on; # add to reduce the latency

            # access
            # allow play 127.0.0.1;
            # deny play all;

            # hls
            hls            on;
            hls_path       /tmp/hls;
            # hls_playlist_length 30s;
            hls_fragment         1s; # add to reduce the latency
       }
    }
}
(7s latency)
(4s latency)
Then, let’s render the video on the website.
- My plan was open an HTML file directly, so I needed to open a browser by using below command to avoid the CORS error (since there was no origin source.)
open -n -a /Applications/Google\\ Chrome.app/Contents/MacOS/Google\\ Chrome --args --user-data-dir="/tmp/chrome_dev_test" --disable-web-security
And it worked, video.js showed the video on the website.
UDP/ TCP
The UDP method comes from [Link], and the code repo is in [here]. I only have little knowledge about website development, so it took me a while to figure out how the method works. I drew a diagram of my understanding below. But I may make a mistake on the detail.

In streamserver.js, he starts a ffmpeg process as child_process. This ffmpeg is used to receive the UDP packet and decode h.264 into mjpeg format. (mjpeg is a valid format for drawing on the canvas attribute on HTML). The transformed data is written into pipe:1, a.k.a., stdout. In the stdout callback of child_process, he turns the data into a base64 string and let socket.io emit the frame on the ‘canvas’ event
Note: I made some changes in streamserver.js
- For the API change:
@@ -15,7 +15,7 @@ function NXServer(httpUIDir, httpPort, streamIP, streamPort) {
                serveStatic = require('serve-static'),
                //app = connect().use(connect(this.httpUIDir)).listen(this.httpPort),   //running from http://
                app = connect().use(serveStatic(this.httpUIDir)).listen(this.httpPort),    //running from file:///
-               io = require('socket.io').listen(app);
+               io = require('socket.io')(app);
@@ -81,7 +63,7 @@ function NXServer(httpUIDir, httpPort, streamIP, streamPort) {
                //              io.sockets.emit('canvas',frame);
                // });

-               var frame = new Buffer(data).toString('base64');
-               io.sockets.emit('canvas',frame);
+               var frame = new Buffer.from(data).toString('base64');
+               io.sockets.emit('canvas', frame);
- For the
mjpeg image quality:
var ffmpeg = require('child_process').spawn("ffmpeg", [
		"-re",
		"-y",
		"-i",
		"udp://"+this.streamIP+":"+this.streamPort,
		"-preset",
		"veryfast",  // from ultrafast to veryfast
		"-f",
		"mjpeg",
		"-q:v", "25",  // the quality factor is from 0 to 31 and 0 is for the best quality.
		"pipe:1"
		]);
In connect.js, when DOM is ready, in the callback, socket.io will get the base64 frame from 127.0.0.1:8080, and when it is on the canvas event, a new image object will be created with the received base64 frame and draw on the canvas.
- Note: I made some changes in
connect.js because of the PAI change
@@ -1,7 +1,7 @@

 var connect = null;

-$(document).bind('ready', function () {
+$(document).ready(function () {
        console.log("streamClient ready!");
        connect = new Connect('127.0.0.1',8080);
        connect.initSocket();
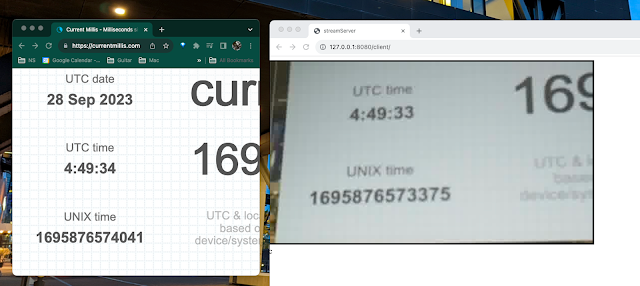
- Note: for the latency benchmark, I found a phenomenon that may relate to image buffer, but I don’t know precisely where the buffer issue belongs, but it should happen in between RPI sending UDP and
ffmpeg receiving the data.
- If I open the RPI sender first, the latency will be around 6 sec.

- But, if I open the RPI sender after the website, the latency could drop to 600 ms.
The UDP method comes from [Link], and the code repo is in [here]. I only have little knowledge about website development, so it took me a while to figure out how the method works. I drew a diagram of my understanding below. But I may make a mistake on the detail.
In streamserver.js, he starts a ffmpeg process as child_process. This ffmpeg is used to receive the UDP packet and decode h.264 into mjpeg format. (mjpeg is a valid format for drawing on the canvas attribute on HTML). The transformed data is written into pipe:1, a.k.a., stdout. In the stdout callback of child_process, he turns the data into a base64 string and let socket.io emit the frame on the ‘canvas’ event
Note: I made some changes in streamserver.js
- For the API change:
@@ -15,7 +15,7 @@ function NXServer(httpUIDir, httpPort, streamIP, streamPort) {
serveStatic = require('serve-static'),
//app = connect().use(connect(this.httpUIDir)).listen(this.httpPort), //running from http://
app = connect().use(serveStatic(this.httpUIDir)).listen(this.httpPort), //running from file:///
- io = require('socket.io').listen(app);
+ io = require('socket.io')(app);
@@ -81,7 +63,7 @@ function NXServer(httpUIDir, httpPort, streamIP, streamPort) {
// io.sockets.emit('canvas',frame);
// });
- var frame = new Buffer(data).toString('base64');
- io.sockets.emit('canvas',frame);
+ var frame = new Buffer.from(data).toString('base64');
+ io.sockets.emit('canvas', frame);
- For the
mjpegimage quality:
var ffmpeg = require('child_process').spawn("ffmpeg", [
"-re",
"-y",
"-i",
"udp://"+this.streamIP+":"+this.streamPort,
"-preset",
"veryfast", // from ultrafast to veryfast
"-f",
"mjpeg",
"-q:v", "25", // the quality factor is from 0 to 31 and 0 is for the best quality.
"pipe:1"
]);
In connect.js, when DOM is ready, in the callback, socket.io will get the base64 frame from 127.0.0.1:8080, and when it is on the canvas event, a new image object will be created with the received base64 frame and draw on the canvas.
- Note: I made some changes in
connect.jsbecause of the PAI change
@@ -1,7 +1,7 @@
var connect = null;
-$(document).bind('ready', function () {
+$(document).ready(function () {
console.log("streamClient ready!");
connect = new Connect('127.0.0.1',8080);
connect.initSocket();
- Note: for the latency benchmark, I found a phenomenon that may relate to image buffer, but I don’t know precisely where the buffer issue belongs, but it should happen in between RPI sending UDP and
ffmpegreceiving the data. - If I open the RPI sender first, the latency will be around 6 sec.
- But, if I open the RPI sender after the website, the latency could drop to 600 ms.
Project to TV
- The latency is around 1.5 seconds.
- The latency is around 1.5 seconds.
Conclusion
-
I can project the camera stream to Chromecast by hosting a website, and the latency can be around 1.5 seconds if I set the device and service properly, and if I want to improve this work, I should:
- Rewrite the sender and receiver without using the third-party app to control the timestamp for each frame.
- Measure the time carefully data flow on each stage for each frame.
- Develop some buffer-dropping mechanism.
Comments
Post a Comment